Abdominal ultrasound is an invaluable diagnostic tool that can give us far more information about abdominal organs than radiographs. It can also be a very daunting procedure – especially for clinicians unfamiliar with how the machine operates.
One of the biggest frustrations with using the ultrasound machine stems from not knowing what each button is for, or how to use them to adjust the image quality appropriately, to obtain the information required.
Over the next few posts, I will offer you hints and tips on how to get started. Once you understand what all those buttons and dials are for, you should be able to operate just about any ultrasound machine with confidence.
I will also explain how to perform an abdominal ultrasound in a systematic manner, as well as how to get the most information out of it.
Buttons and their uses

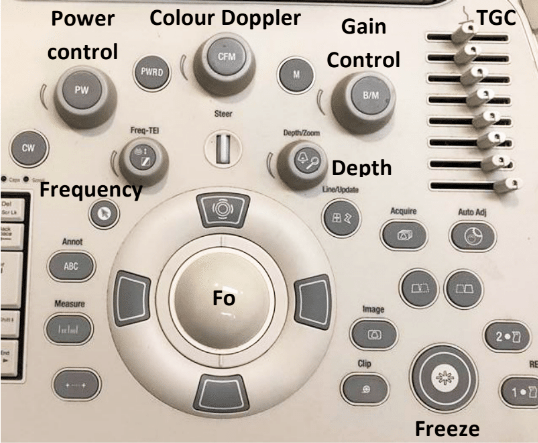
Figure 1 is an example of a typical ultrasound machine control panel. The following explains the different buttons and dials present, and their uses.
Power control
The power or output control affects the strength of the emitted sound pulse. Keep this to as low as possible for the required depth.
Gain control
The gain control regulates amplification of all returning echoes non-selectively – that is, it makes the entire image brighter.
Time gain compensation
The time gain compensation (TGC) selectively regulates amplification of echoes returning from various depths.
The objective of TGC is to provide a uniform image from top to bottom. Returning near-field echoes are already strong and may actually need to be suppressed. Far-field echoes are weaker and, therefore, may need to be amplified more according to the depth from which they return.
Depth
The depth allows you to choose how deeply into the tissues the image will display. Use an appropriate depth to view the structure of interest – that is, adjust the depth so the structure fills three-quarters of the field of view.
Focus
The focus (Fo) provides the best image at a certain depth and should be adjusted so it is at – or just behind – the area of interest. The focal point is the yellow arrow on the right side of the screen, which can be moved up and down with the Fo tracking ball.
Freeze
The freeze-frame control creates a frozen on-screen image for closer inspection, annotation, measurements using electronic calipers and producing permanent documentation with digital, film or paper images.
Clip
The clip button records a short video clip.
Colour Doppler
The colour Doppler assesses fluid flow. It is useful for differentiating between a vessel and structure of equal echogenicity, such as an adrenal gland or lymph node, and for determining the vascularity of a structure, such as a torsed spleen, mass lesion or abscess.
Flow towards the transducer = red, while flow away from the transducer = blue.

Leave a Reply