There’s a part of me that’s constantly surprised cytology works at all.
The idea you can suck up a few cells from a patient, squirt them on to a slide, stain them and – by looking at the shape of the cells and how they relate to one another – work out what is happening in the patient simply, and relatively cheaply… well, it’s a little miracle of modern medicine.
Except it doesn’t always go as swimmingly as that, does it? However much we prepare our clients for the fact we might not find what we need with this test, we’re still a little crushed when our samples are non-diagnostic, aren’t we?
Giving your best
I’m feeling unusually community-spirited today, so I’ve jotted down a few thoughts – the first in an occasional series of how to get the most out of your clinical pathology samples.
When I read cytology reports in practice, I always felt as if I was being judged. They always open with the score: “Cellularity excellent, preservation is poor.”
Wow. Harsh. No punches pulled.
Of course, I understood the point of it – the cytologist was helping me understand why they may or may not have been able to come to a conclusion on the specimens I sent. We’ll talk about cellularity another day, but here’s a few tips to try to avoid getting poorly preserved samples.
Drying
For the majority of preparations, just leaving your slides out on the side to dry out in the air for a few minutes is fine. Drying will “fix” the cells and material on it (yes, I’m afraid it means all the heroic macrophages and neutrophils will die, but we have to make some sacrifices for a diagnosis), leaving it ready to be stained once it reaches the lab.
Once your preps are air dried, they’ll be stable for weeks – probably months – so don’t worry if you miss the post or your courier.
However, if you package up the slides wet, they won’t fix properly. The cells will remain active and metabolising, cell membranes will swell and rupture, and you’re heading towards non-diagnosticville.
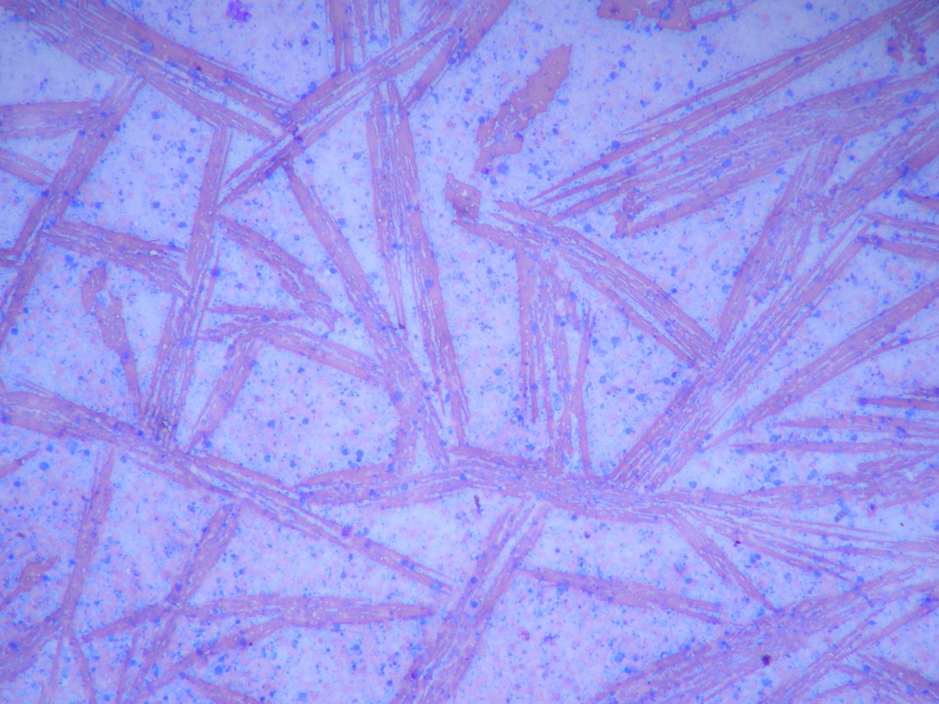
Here’s what a slide that was packed up while it was still wet looks like under the microscope:

The red smears were once beautiful biconcave erythrocytes, but now they’re ugly streaks of haemoglobin crystals, and the blue blobs – once identifiable cells – are now (to use a technical cytological term) mush.
The most common specimens I see packed up wet are joint fluid preps – something to do with all those glycosaminoglycans means slides of synovial fluid take a long time to dry, so bear this in mind when you’re sampling.
If you’re in a hurry (if a courier is on the way and you need a diagnosis pronto) you can use a fan or hairdryer to speed up the process, although it won’t be necessary in most situations.
Incidentally, there’s a difference between “greasy” and “wet” – greasy preps are fine, and you’ll be waiting a long time for those to dry out, but the top tip here is: if your slide still looks wet, give it a bit longer before popping it into your slide holder.
Necrosis
It’s perhaps not a huge surprise that necrotic cells are hard to identify; their cell borders are blurry, their nuclei are disintegrating, and there are macrophages and neutrophils all over the place. I end up surveying this mess with the kind of despair I get when I have ventured up the stairs after suddenly realising the kids have been ominously quiet for 10 minutes.
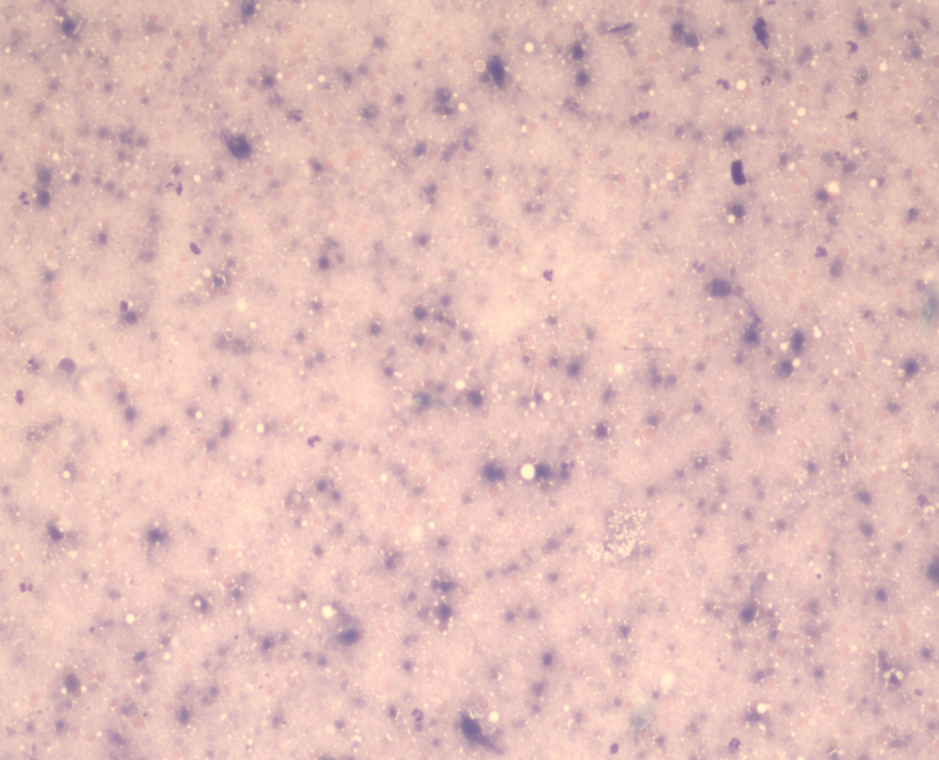
Here’s some necrosis, for reference:

A greyish-purple spotty mush with a few fat droplets scattered around.
Now, my wife would argue all cytology specimens look like this, but you’ll have to take my word for it that, with this prep, we’d have to use even more imagination than normal to be able to identify anything.
The presence of necrosis, in itself, can be a useful finding, as it usually means either quite severe inflammation or, more likely, infarction or neoplasia – but that’s still a pretty broad range of options.
The best way to avoid getting slides full of necrosis is to avoid sampling right in the centre of large masses, where the degeneration tends to be worse. Aspirating the periphery of masses is more likely to be useful when lesions have a necrotic core.
The flip side of the coin is that, for some lesions (especially bone masses), all you have at the periphery is inflammation, and all the action is going on at the centre. Therefore, the top tip for this section is: try to take multiple samples from both the centre and periphery of the mass you’re sampling.
Formalin
Formalin is vitally important for fixing histopathology specimens, of course (because attempting to air dry a large chunk of flesh isn’t really going to work). However, the fumes that leak out from a formalin container really don’t agree with cytology specimens, in the same way I really don’t agree with Nigel Farage.
Formalin makes individual cells very hard to see, let alone identify.
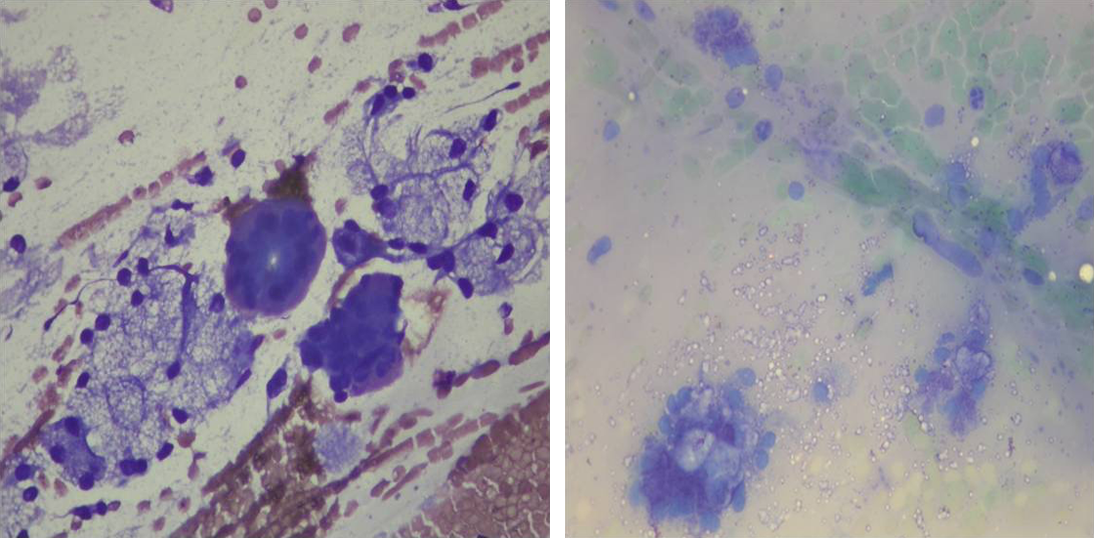
Here’s an example. The left image is a relatively well-preserved specimen from salivary tissue. Among other things, you can see nicely-coloured red blood cells and clusters of vacuolated epithelium busily producing saliva (well, they were until they got air dried, anyway).

By contrast, the image on the right is a slide of salivary tissue that got fiddled by formalin fumes. Those pale green things are red blood cells – although it’s hard to really apply the term anymore; formalin does to blood cells what gamma radiation does to Bruce Banner.
You can also see some bluish blobs that were probably once epithelial cells, but on this preparation we’re not going to be able to tell you whether there’s anything unusual about them.
Here’s the tip for this section: don’t package up cytology and histology specimens together.
Pre-staining and other issues
Well, I think that’s enough tips to be getting on with. A few honourable mentions for you – ruptured cells are also a common cause of poor preservation, but I thought that would be easier to discuss when I talk about cellularity in a later blog.
Finally, I’d like to mention pre-staining slides. I understand you’ve gone to the effort of getting a sample, and you’re keen to have a look at them yourselves. By all means, do so – cytology is a beautiful subject, and I’d hate to deny anyone the pleasure of seeing biology in action on a microscopic scale – however, clinical pathologists are (and there’s no easy way to say this) fussy buggers. We’re set in our ways, and we’re used to our staining patterns, which means when we get a pre-stained slide, it throws us off our stride.
In-house stains tend to accentuate nuclear features, which can make cells look more malignant from our perspective, and although we’re used to this, it makes it harder to assess these features objectively.
Additionally, some very important things (I’m looking at you, mast cell granules) don’t stain at all well with in-house stains, and won’t restain even when they go through our stainer, making simple diagnoses more complicated.
So, here’s my final tip for today: by all means, stain some preparations and look at them in-house, but leave some unstained for the lab.

Leave a Reply